Followers

Showing posts with label DIY. Show all posts

Sunday, December 2, 2012

Homemade Hot Chocolate and Easy Holiday Gift! Yummy!!

This time of year is perfect for so many things- time with family, staying in and cozying up with a movie, singing Christmas (or holiday) songs, AND enjoying the perfect cup of steaming hot chocolate topped with marshmallows and/or whipped cream! YUM

I started making my own hot chocolate and it is divine! Just the right amount of chocolaty goodness without being overly sweet and it definitely has a nice richness to it. Besides that, it is SUPER easy to make. I will give you my bulk recipe that I use. I make one huge amount, then distribute some to friends and family and keep the rest for our personal holiday enjoyment :-)  If this recipe is too large, just cut in half or even 1/4 and make the amount you need or want!


Cre8tiveKtina's Hot Chocolate- BULK Servings (100)
  • 24 cups of Dry milk
  • 13 cups of Baking coca
  • 25 cups of Powdered sugar (confectioner's sugar)

Keep in mind you will need a VERY large container to mix all the ingredients for this amount... I used a large summer cooler haha  (I made sure it was impeccably clean, but needless to say, I had nothing else size-wise to hold this recipe).

Once the bulk amount is made, all you need is 2-3 tablespoons of the cocoa mix and add it to a cup with 1 cup of boiling hot water and you have an amazing cup of hot chocolate! 

This is a 2-quart container we kept for personal hot cocoa

You can always edit as necessary too. Like it sweeter? Add some more sugar. Need more chocolate? Add more cocoa. Not creamy enough? Add more dry milk. No matter what you preference is, you can adjust it and make it the best cocoa you have ever had! And you made it, so you can be proud of your dazzling creation and enjoy it's tastiness.


I made enough hot chocolate so that I could give out little holiday baskets to neighbors, family, and friends (The holiday baskets I make will be in another post see keep a lookout for that!). The holiday baskets will include nearly 1 cup of hot chocolate mix per basket. So I had broken down the amount of baskets I was making, how many servings I wanted per basket and then how many I would need total. When all was said and done and all the calculations were in, I needed to make 100 servings of hot chocolate.100 seems like a lot but this was enough for me to make enough servings for everyone I was giving it too as well as a good amount for my own family to sip on and enjoy during the holidays. 


*Keep in mind that this is how I made it, it's not exact and everyone has different tastes. Feel free to change it as you need so you and your family are happy with it. This is just how I make it and how my family and friends love to drink it!*


SPECIAL NOTE FOR PEPPERMINT COCOA* For anyone who likes peppermint hot chocolate, I also made a batch of that! To give your hot chocolate a peppermint twist, simply add a heaping 1/8 tsp. of finely crushed peppermint per serving. Truly delicious and so much more satisfying drinking a delicious cup of peppermint cocoa that YOU made :-)


Take the time to smell the chocolate and enjoy this warm, tasty treat! Perfect for the holidays or any season! 

Thursday, November 8, 2012

DIY Home Organizing Binder/Home Management Binder! Part 1 of 2

The more time I spend on house projects and crafts with the kids, the less time I have for all the other little stuff. Home management binder, to the rescue!! The idea for this is to keep all my little stuff, ideas, dates, and little stuff I need in  one place and completely organized for easy access and efficiency.

So, to show you how I created my binder, I am doing a 2 part post and this first post is part 1. Part 1 is the outside of the binder and part 2 will be the inside! Keep a lookout fora  future post on part 2, where I show you all the printables and goodies I stuffed inside!

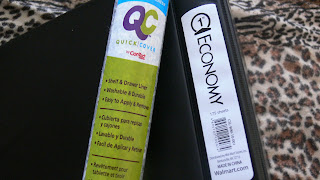
This binder is super easy and affordable to make, and to personalize! Now, you can get a basic black, 1" binder at Walmart for .97 cents, as pictured here. I made a few binders for other people so I decided to make them a bit more fun and personal.
 The roll of Quick Cover is simply a self-adhesive "shelf liner" or basically a patterned contact paper. It has a coat paper that your remove and you can stick the print where you want it. I got this roll at Dollar Tree for $1!

I cut a rectangle shaped piece for the front of the binder....
 And a smaller strip piece for the side...and then stuck both to the binder using adhesive side.
 I printed out title pages for the front of the binders and small labeling strips for the sides. I just did this whole thing in word, and picked out clip art that I liked, base don who the binder was for and what I thought they would like. You can personalize this in ANY way... use any colors, objects, pictures, whatever you like!
 Notice the right side title says "task & reward book".... Yes, you can make a binder for the little ones if you want and they can stay organized too! (This one is for my 12 yr old sister, and the binder offers chore sheet, reward system, consequence page AND boredom bursting activities!)
 I used Mod Podge (matte) and a foam brush to glue and seal the title page onto the shelf liner. I did only the back and then waited 5 full minutes. Then I coated the front of the title page 5 times, allowing a 20 minute drying in between each coat. (VERY important to let the coats drying in between, and a full 15-20 mins!)

 I did use the first 2 coats over the title page and the last 3 I did over the entire front cover, to help seal the liner in as well. Because I used the matte finish, it gave the front a wood, almost grainy type finish. But not in a bad way! It has a nice texture when you touch it and it definitely feels solid and sealed. I don't feel seams, and so I know it will last and everything will stay stuck on! :-)

*Note* I used regular printer paper for my title pages and it did create a few small bumps because the paper is thin, but the bumps were mostly able to be smoothed out. Another alternative, which I should have done, would be to print on cardstock!
So in all, these binders came out really cool, they are personalized for the people they are going to AND the cover is solid. You can stick this in a bookcase without worry of the front coming off, and the side labels help to find it fast!

What do you think of this binder? Would you make something like this for yourself? Keep a look out for my next post on all the stuff I put in the binder to help organize my house and life and things I found to help with these binders I made for family that may be useful! That post will be SUPER informative!!

Until next time! :-)
Cre8tiveKtina

Saturday, October 27, 2012

A Painting Series!- Series #1- Old Changing table transformed into modern boy's dresser!

One of my favorite ways to make something look completely new or different is to paint it! You can have so much fun with the different colors combinations, accenting with your favorite colors, or just creating a new feel to a certain room! Painting can also be a cost-effective way to really add a clean look to something without just replacing it! Aside from those things, painting is relatively easy and sometimes, downright fun!

The hubby and I have been doing lots of different painting jobs around the house so I am going to document and post, whether it's good or bad, you get to see what we got into and how well it turned out.


Our first painting job to tackle, we decided, was this old changing table. It is worn, has old stickers on it, and the "knobs" were mostly broken! We use this a dresser for our son, and this was given to us. So we figured we would paint it to better match our son's room and personality AND it will look more like a dresser, haha

Old Changing Table-We use as a dresser


Making sure you have your needed supplies together is #1. Besides the normal paint and brush utensils, Painter's tape is a must! It helps with straight lines and effect! You'll see why it is a NEEDED item for this project.


These were the old, half-broken "knobs" from the dresser I described above. Very ugly, most are broken and  obviously dated. I am holding onto them for a little while, just to see if I can think of a way to re-purpose these. Any suggestions? Post below! If I think of a use or hear a great one, that will be another post :-)


The next thing was taping off each thing I was going to paint...


We went paint crazy and started on the dresser before I got a tape picture BUT there are these inset areas on this old changing table, one on each side and one along the backboard, as pictured. We taped of those inset areas, which you can see the painter's tape in this picture, even though our paint is blue too! lol


The pic below shows the inset area on the side, and the blue painter's tape going around the edge of the inset area.


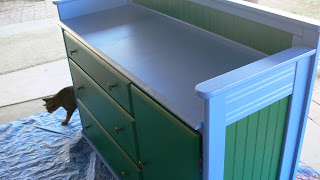
 Besides those inset areas, the rest of the frame for the dresser was painted a softer blue. The actual paint color, if interested, is called SOFT SAPPHIRE. I think a shade or two deeper would have been better but I do like this color and I didn't want it too dark.


 Once the blue dried completely, we removed the tape THEN taped around the outside of the blue, so we could paint the inset areas without going into the blue we already laid! Notice the green smudge at the bottom of this side inset area...it is on the painter's tape, not the dresser :-)
 We painted all of those inset areas AND the fronts of the drawers in this nice green color which is called FOREST GREEN. Both paints were by Glidden.


We waited until the paint was completely dry and then removed the tape again. One we added the new knobs onto the drawers and put everything back in, it was like a whole new piece of furniture!

 I love how the colors play off each other and these are my son's 2 favorite colors! The colors really pop and help add some personality to his room. We plan to paint his bookshelf green, to match :-)


 I really am amazed at how great it looks! It looks like a $500 dresser, and it only cost us about $30 to get this look! We were given the changing table, so all we bought was paint. And now my son has an awesome and modern dresser. This same idea can work with many pieces of furniture and tons of color combinations!


 Let me know what you think of this painting project! Do you like the color combo? What furniture do you have that can totally be changed with just a coat of paint?


Tuesday, October 9, 2012

DIY Kid's Towel "Rack" using Command Hooks

You can only go into the bathroom so many times and see towels everywhere before you get fed up! Anyone who has kids will probably know that feeling. All 3 of my kids seem to forget that our towel rack even exists! Honestly, I am lucky if it even stays in the bathroom...sometimes I find them down the hall, in a bedroom, or wherever they randomly tossed it after drying themselves. It gets almost ridiculous, especially since none of my children are babies anymore.

I decided that something had to be done to make it easier, more efficient, more practical for the kids, AND maybe even a bit prettier. And I came up with a quick and easy solution! My newest favorite product right now is the 3MM Command Hooks. They come in all different styles and sizes to hang all different things without hurting your walls or busting out any tools. I have no problem using a drill or hammer but honestly, my life is easier when jobs can get done without them.

But the hooks alone in the bathroom are rather dull...Efficient, easy, and practical (as I wanted) but not really any excitement. So my solution? I grabbed 3 thin wood plaques from Walmart for .97 cents each. They were just plain with a light wood color, but I saw potential! I painted each plaque with a different color, using acrylic paint. I used a light pink, dark pink, and a vibrant blue to lay a colored base on each plaque.

Then I used one of my best and favorite resources.. Google! And I looked up letters in different fonts. I printed each child's initial in a larger size and cut it out and used it as a stencil. My letters were A, L, and J. Both my daughters names begin with A but my middle daughter (Alexandria) goes by Lex or Lexi and we didn't want any confusion with the same letters so we used L for her instead of A. Each letter was colored in using different colors to stand out on the base color. After the letters were in place, I used some glitter and went over the girls' initials with it because most girl loves things that sparkle! Even with the letters, I still felt they need some type of accent or pop so I added a little picture on each plaque. I painted flowers for my first daughter, a butterfly for my second daughter, and a car for my son.


I made sure to measure and mark so the plaques were an equal distance apart from each other and all at the same height. Once I had the plaques on the wall, I mounted the Command hooks right below them. The best part about this, besides how adorable the plaques, is that each kid is excited to have their own hook AND they can easily reach it. Now they are excited to put their towels up, they admire their initial and know which hook is theirs. There is no fighting about it and it even adds a nice pop of color to the bathroom!

What do you guys think? Have you used these Command hooks in your bathroom or house yet? How about the personalized plaques, cool right?! Anymore ideas on how or where to use them? I will have additional posts on places I stuck these nifty hooks! :-)


 Are these cute and practical or what?! :-)


-Cre8tiveKtina
xoxo