Followers

Wednesday, October 31, 2012

EASY Halloween Tablescape & Easy Halloween Decorating tips!

Halloween is here!

 It's more fun to play with the kids and make spooky or gross looking food, rather than spending a ton of time decorating! Here are some really cool Halloween decorating ideas that are fast, easy, and AFFORDABLE! Key word because most of the things I used can be purchased at the dollar store! See what other things you can find, and just be cre8tive with it! You can make so many awesome things with just a few supplies or items :-)


This tablescape is perfect for Halloween and super easy to create! I like to mix the creepy with the fun, so the kids get a little of both without being bored to scared! haha
A black tablecloth is a perfect base, and this tablecloth can be used for other things since its not Halloween-specific!
 The little tray was bought at the dollar store, as well as the rubber insects and critter! I also got one strand of fall leaves and arranged everything on the tray. The hubby got me flowers a few days before, so they already have a dying look to them, which I think is a great touch for the Halloween look!
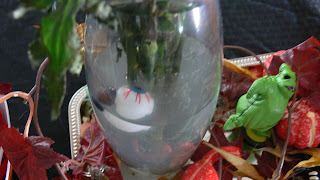
 I also hung a few critters from the flowers in the vase, just to add more creepiness to the pretty flowers.
I also had a small plastic statue of Oogie Boogie from The Nightmare Before Christmas, and I added him to the tray. I found a bag of foam gourds at the dollar store, and it came with 5. I spread those along the tray as well, which i think helps pull in more of the look of autumn. After Halloween, just remove the creepy stuff and you have a great display for autumn or Thanksgiving!

 A cute little candy dish on one side of the tray and a real, medium-sized pumpkin on the other. A nice cozy feeling of autumn fills the room with this tablescape!
 A floating eyeball? Would Halloween be complete without it?! It was actually from a bubble container that one of my kids got last year. Once the bubbles were used, I saved the container and it made it's way into my dreary flower vase. Another small spooky touch that really adds to the fright of Halloween!
 Another great aspect of this table display? Still plenty of room to sit and have our Halloween treats and dinner! This display is large enough to be a nice eye-catcher without taking over the whole table, we still have to eat right?! :-)
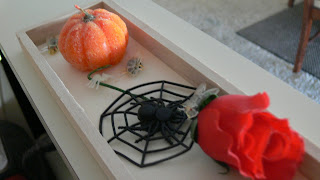
 A quick and easy idea is to take a small box (I used a small wooden ledge box I had) and add a flower, as well as some more little bugs. I also had a few small pumpkin candles from previous years, so I put one i n the box along with some flies and a spider with a web. This took no time at all to throw together and sits on the ledge that separates my kitchen a dining room. Walking past the rose catches your eye but a closer look reveals the pretty flower and pumpkin have been overrun with Halloween critters!

 Spider webbing is super affordable, about $1 per bag almost anywhere. Throw it over a house plant, fake or real, for an eerie plant display!  No plants? No problem! Throw it around some pictures or wall shelves to give the feel of a haunted house!


 Normally cards aren't sent for Halloween, but if you have little ones, you may get some! We have family in other states that send the kids Halloween cards, so I taped those along the side of my cabinet and left on the ledge with a small collection of candles! My oldest also made a spider that just HAD to go on the wall...

 Pumpkins, Pumpkins! If you want to carve or create some pumpkin art, here are some ideas!
 The classic pumpkin face is very easy and will always be a winner! Easy for younger people to carve too! A little more difficult ones can be just as fun! We used 2 stencils on one pumpkin, the BOO! and the bat, which came together very nicely! They will glow beautifully tonight!
 My daughter, Lexi, LOVES the movie The Nightmare Before Christmas and so it seems almost every year, we have a Jack Skellington pumpkin! Last year, it was just his face and this year it was from his waist up. This one was the first carved,, as you can tell he is already starting to wilt! But, he will last through Halloween and that's what counts! Don't feel like carving or just dealing with the mess? We have ideas for that too!

 Don't forget to recognize Breast Cancer Awareness, which is the entire month of October. We painted a pumpkin pink, then added dark pink glitter ribbons all over and topped it off with a pretty pink ribbon top!


 Don't want to carve OR paint?1 I still have a solution for that too! I used regular straight pins and just pushed them into, creating a little scroll detail and then the word "Boo". I decided to add some black rhinestones just to give it a little something extra!

 Lastly, if you have kids, let them have a fun and messy time(believe me, it IS messy!) and let them go crazy painting their own little pumpkins! You can see each kid's personality through their little pumpkin arts and if you use water-based acrylic paint, clean-up isn't so bad!

Hope you like this quick and easy decorating tips for Halloween! Christmas planning will be starting soon in this house so be on the look-put for upcoming Christmas decor and planning tips!

How do you like to decorate for Halloween? Would you try any of these easy decor ideas or do you have some great time or money-saving tips for Halloween decor? Post a comment below and share your thoughts or ideas!

Saturday, October 27, 2012

A Painting Series!- Series #1- Old Changing table transformed into modern boy's dresser!

One of my favorite ways to make something look completely new or different is to paint it! You can have so much fun with the different colors combinations, accenting with your favorite colors, or just creating a new feel to a certain room! Painting can also be a cost-effective way to really add a clean look to something without just replacing it! Aside from those things, painting is relatively easy and sometimes, downright fun!

The hubby and I have been doing lots of different painting jobs around the house so I am going to document and post, whether it's good or bad, you get to see what we got into and how well it turned out.


Our first painting job to tackle, we decided, was this old changing table. It is worn, has old stickers on it, and the "knobs" were mostly broken! We use this a dresser for our son, and this was given to us. So we figured we would paint it to better match our son's room and personality AND it will look more like a dresser, haha

Old Changing Table-We use as a dresser


Making sure you have your needed supplies together is #1. Besides the normal paint and brush utensils, Painter's tape is a must! It helps with straight lines and effect! You'll see why it is a NEEDED item for this project.


These were the old, half-broken "knobs" from the dresser I described above. Very ugly, most are broken and  obviously dated. I am holding onto them for a little while, just to see if I can think of a way to re-purpose these. Any suggestions? Post below! If I think of a use or hear a great one, that will be another post :-)


The next thing was taping off each thing I was going to paint...


We went paint crazy and started on the dresser before I got a tape picture BUT there are these inset areas on this old changing table, one on each side and one along the backboard, as pictured. We taped of those inset areas, which you can see the painter's tape in this picture, even though our paint is blue too! lol


The pic below shows the inset area on the side, and the blue painter's tape going around the edge of the inset area.


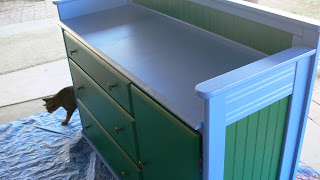
 Besides those inset areas, the rest of the frame for the dresser was painted a softer blue. The actual paint color, if interested, is called SOFT SAPPHIRE. I think a shade or two deeper would have been better but I do like this color and I didn't want it too dark.


 Once the blue dried completely, we removed the tape THEN taped around the outside of the blue, so we could paint the inset areas without going into the blue we already laid! Notice the green smudge at the bottom of this side inset area...it is on the painter's tape, not the dresser :-)
 We painted all of those inset areas AND the fronts of the drawers in this nice green color which is called FOREST GREEN. Both paints were by Glidden.


We waited until the paint was completely dry and then removed the tape again. One we added the new knobs onto the drawers and put everything back in, it was like a whole new piece of furniture!

 I love how the colors play off each other and these are my son's 2 favorite colors! The colors really pop and help add some personality to his room. We plan to paint his bookshelf green, to match :-)


 I really am amazed at how great it looks! It looks like a $500 dresser, and it only cost us about $30 to get this look! We were given the changing table, so all we bought was paint. And now my son has an awesome and modern dresser. This same idea can work with many pieces of furniture and tons of color combinations!


 Let me know what you think of this painting project! Do you like the color combo? What furniture do you have that can totally be changed with just a coat of paint?


Friday, October 19, 2012

Easy Banana "Cream" Pie with Chocolate Crust- For under 3$!

One of my favorite, possibly my all-time favorite, fruit is banana! I love bananas by themselves, banana nut bread/muffins, with my cereal, with peanut butter on a sandwich and so many others... which includes... of course, banana cream pie!
I have a super easy and inexpensive recipe for a quick banana pudding-cream pie that is delicious! You will love how smooth and yummy the pie is but you'll make it again and again because it's so darn easy and affordable! I got my major components for this pie for around $3! 


 Supplies Used
- 2 Medium-large bananas
-1 Bag of Goldfish- Chocolate Graham flavor
-1 Large 6 oz. package of banana (or vanilla) instant pudding
-3 Tablespoons of butter
-Whisk
-Rolling pin
-Sandwich bag
-Large mixing bowl
-Pie pan


*PREP NOTES* Melt the butter, you will need it for the crust and pre-make the instant pudding*


Step 1- Place goldfish into sandwich bag and use rolling pin to smash goldfish into crumbles(as pictured below)


Step 2- Combine the melted butter and chocolate crumbles and form into pie pan (using a flat bottom glass worked very well!)


Step 3- slice one of the bananas and put a single layer covering the  top of the crust.


Step 4- Add the pudding into the pie pan over the bananas and crust and smooth over


FINAL Step- Allow pie to chill for about 1 hour in the fridge. When ready to serve, slice the other banana and layer it on top! Upon serving, add a dollop of cool whip or whipped cream and there you go!

I know! Where is the whipped cream pic?! But I suck! And i don't have one :-( We ripped into this so fast and before I knew it, the pie was gone... But add the whipped cream on top in your mind  :-)
 A super quick and easy but satisfying pie! It truly was really yummy and took me no time at all to put together. I love the chocolate crunch you get from the crust and the rich pudding filling is only second to the fresh bananas layered on both the top and bottom! What's not to love?!

Be sure to add the top layer of bananas AFTER you chill it. Bananas brown quickly after being opened. Don't forget the whipped cream and enjoy this delicious and easy Banana Pudding/Cream Pie!

Is this something you would try? Can you think of other flavor combinations that would be great to pair for this type of tasty treat? My head is already spinning with more pie ideas! Yum! Maybe for the holiday season.....

Tuesday, October 16, 2012

Cute/Kawaii Pumpkin Nail Art with Video Tutorial!

Halloween is coming fast and I can't help but try to think of new and fun nail art! I am so used to trying to do scary and gross that i thought I might try something cute for a nice change for this holiday.


I decided to do some really cute/Kawaii pumpkins, with cute black beady eyes and some pink rosy cheeks! They really do look so cute and for having a Halloween theme, they are bright and vibrant rather than dark and dreary.


I really think these are a cute option if you don't want to get too creepy or gross for Halloween. I am going as the Queen of Hearts, so I still have to decide how to match my nails to the costume!


Here the tutorial on how I did this super easy and cute design! What do you think? Any Halloween plans for your nails this year?


Just goes to show that halloween nails don't always have to look like they came right from a horror movie! What do you think about "cute" Halloween nails?